Food
So you're going on a camping trip. Not a car camping trip, but one that takes you away from your car, and the cooler in it. What food should you take? Believe it or not the answer is fairly simple - whatever you like. There's a catch of course. Many foods will spoil within days unless they come in heavy sealed glass bottles or if they are not refrigerated.
The type of camping trip you are doing will partly determine what foods you might bring. A hiking/backpacking trip will require the most attention to weight. A canoe trip allows you to carry more weight and therefore your food choices may be more varied. It also depends on the weather. The cool temperatures of an early spring or late fall trip and the cold temperatures of a winter camping trip will allow you to bring fresh foods (i.e. non-dehydrated) for longer periods.
Breakfast
On a canoe trip you generally want a breakfast that is easy and fast yet one that provides plenty of carbohydrates to fuel your body for the day. The traditional Instant Oatmeal packages are convenient, fast, and high in carbohydrates but most of the calories are coming from sugars in the flavourings. They are also made from highly flattened oats which are indeed "instant" but also gives them a high glycemic index (i.e. the carbs are absorbed faster by the body). Instead of Instant Oatmeal try large flake oats or steel cut oats. Both require a bit more time (and fuel) cooking in a pot but the end result is a healthier breakfast that will "stick with you" for longer. Save fuel by soaking the oatmeal in a pot or other container overnight. But don't leave the Instant Oatmeal packages at home. Put half a dozen in a zip-lock freezer bag and bring them with you to eat in the event of an emergency.
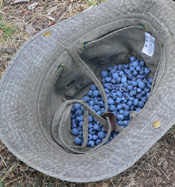
Depending on the location of your trip, if you are on a canoe or hiking trip in late July and into August plan on having wild blueberries with your pancakes.
Lunch
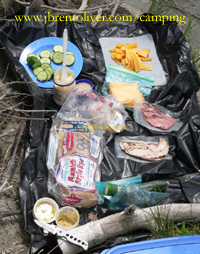
- fresh vegetables can be brought for the first day or two; carrots, green and red peppers and cucumbers hold up well
- mayo or similar whipped spreads can be purchased in small plastic bottles that require no refrigeration until opened - in cooler teperatures, the opened bottle should be good for one or even two more days
- wraps (flat bread), cold meat (vacuum sealed), cheese (pre-sliced most convenient), cucumber
- wraps (flat bread), tuna (in foil packaging), cheddar cheese, mayo
If time permits, prepare ingredients, fold wrap in half and brown in heated pan with a bit of olive oil.
- whole wheat crackers, tuna in foil packaging, cheese, peanut butter, cucumber
- summer sausage, cheese spread, peanut butter
- pepperettes, olives, cheddar, melba toast
- pre-cooked, smoked turkey or chicken (a.k.a. turkey/chicken bacon) keeps well and is good on bread with tomatos, cheese and mayo
To keep even longer, heat turkey/chicken in a pan as per instructions on package and then seal using a food sealer.
- summer sausage, cheese spread, peanut butter
- rye bread (normal sandwich bread is hard to keep from getting squished; assume enough for 1.5 to 2 sandwiches per person)
- pickles and olives keep well for multiple days in a Nalgene container
- hard-boiled eggs (1st day only; great with mayo)
- Riveta grain bread, peanut butter, jam
- Melba toast, aged Gouda cheese, summer sausage
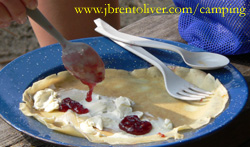
- Breakfast pitas with peanut butter and cream cheese
- Crackers, pita or other flat bread with hummus
For dessert consider the following...
- cookies
- fruit bars - get the kind containing 100% real fruit, not the fruit-flavoured, rolled-up sugar snacks - products from Sun-Rype are a healthy choice
- chocolate (bars, wafers) - consider dark chocolate, some claim that it is in fact a health food!
- Add a jar of Nutella to dip chocolate wafers in. Double yum!
- granola bars (the kind with a chocolate coating of course!)
- dehydrated fruit
Dinner
Camp dinners can be as varied as your favourite cookbook. Most foods can be dehydrated (d/h) and returned to
their normal state (or close enough) quite successfully. In some cases the texture may be a bit different than if fresh
but it will be equally as tasty and nutritious. To give dinner food ample time to rehydrate and to reduce
the amount of fuel required, most foods can start being rehydrated at lunch or earlier. To rehydrate, put the
dehydrated food in a zip-lock freezer bag or Nalgene bottle and cover with filtered water.
The most convenient base carb -- yes, carbs are okay, you are burning more calories than usual when on a
camping/canoeing trip -- are rice and noodles. They come already dehydrated - nice!
There are plenty of ingredients available that are conveniently packaged or purchased already dehydrated at a bulk food store. First, some basic ingredients that require little or no pre-trip preparation from which a great meal can be planned...
- pasta - regular processed white wheat pasta or more nutritional choices: whole wheat pasta, brown rice pasta
- potato - flakes or scalloped
- tuna and salmon - in a tin or foil pouch
- rice - white, brown, wild, regular or parboiled (less cooking time means less fuel used)
- cheese
- summer, landjaeger and other dry sausages and salamis
- raisons - and dried cranberries, apricots
Try some of these canoe-trip tested combinations...
- d/h chicken, rice, d/h pineapple, d/h madarin oranges or dried apricots, carmalized onion, sweet curry
- d/h chicken, egg noodles, bacon pieces (premade and vacuum-sealed), d/h peas, alfredo sauce mix, powdered milk, top with black pepper and/or parmesan cheese
- d/h chicken, d/h peas, d/h red pepper, alfredo sauce mix, powdered milk, black pepper, served over whole wheat pasta
- d/h ground beef, whole wheat spaghetti, d/h mushrooms, d/h green peppers, d/h red peppers, cheese, oregano
- spaghetti noodles, dried basil leaves, fresh cherry tomatoes or sun-dried tomatos (depending on trip length), olive oil
top with dried parmesan cheese
- wraps, d/h chicken, d/h green and red peppers, cheese, powdered sour cream, powdered milk
wrap chicken, peppers, cheese and sour cream; pan fry wrap in a small amount of olive oil before serving
- dried beef, d/h mushrooms, d/h vege mix, cheese, d/h peas and carrots, d/h scalloped potatoes, beef bovril
prepare as a stew
- d/h chicken, d/h peas, bacon, carbonara sauce, milk powder, cheddar cheese, chicken bovril
- dried beef, powdered sour cream, powdered milk, egg noodles, salt
- dried beef, d/h mushrooms and sun-dried tomatoes sauted in olive oil and garlic, cheese, d/h peas, d/h potatoes, powdered sour cream, d/h chives, powdered milk
- d/h turkey or chicken, d/h peas, pasta sauce mix, fettucinie noodles, chicken bovril, crispy onions
- d/h ground beef, TVP chili mix, d/h green and yellow beans
saute rehydrated beans in olive oil, garlic, lemon juice and parsley; serve with cornbread made in an outback oven
- d/h scalloped potatoes, d/h peas, d/h chicken or ham
Try a home-made sauce: saute a chopped onion in butter; add a couple tablespoons of flour and mix; add 1-2 cups of cow or soy milk made from powder; heat to boiling and then add grated havarti cheese; pour over cooked scalloped potatoes; serve with ground pepper
- Ramen noodles + tuna
For dessert consider the following...
- Instant Pudding
| Camping Pudding Mix |
- 2 x 113 g instant pudding powder
- 1 1/2 cups powdered milk
|
|
Combine pudding powder and powdered milk in large zip-lock bag.
To prepare, add 3 3/4 cups of filtered water to zip log bag; shake and kneed for 2 minutes; place bag in pot of cold lake or stream water for an additional 10 minutes or until thickened. Serves 6-8.
|
- Instant custard mix.
- Chocolate - bars, wafers
- Instant cake mix prepared in an outback oven.
- Skor Bars - a delicious favourite that can be made ahead of time and travels well (although a hot day may melt the chocolate topping)
| Skor Bars (a.k.a. Hershey's Chipits® Toffee Bits Triangles) |
- 1 cup (250 mL) butter softened
- 1 cup (250 mL) packed light brown sugar
- 1 tsp (5 mL) vanilla
- 1 egg yolk
- 2 cups (500 mL) all purpose flour - or use 2 cups of a gluten-free flour mixture such as:
- 400g/14oz garbanzo bean (chickpea) flour
- 400g/14oz potato flour
- 200g/7oz fine rice flour
- 200g/7oz arrowroot
- 1 1/4 cups (300 mL) CHIPITS® SKOR® Toffee Bits, divided (in your store's baking section)
- 2 cups (500 mL) semi-sweet chocolate chips
|
- Heat oven to 350F (180C).
- Line a 15-1/2 x 10-1/2 inch rimmed baking sheet with parchment paper; set aside.
- In a large bowl, beat butter with brown sugar until fluffy. Beat in egg yolk and vanilla until creamy.
- Stir in flour and 1 cup of the toffee bits until well combined. Press dough evenly into prepared baking sheet.
- Bake for 18 to 20 minutes or until light brown; transfer pan to cooling rack. Immediately sprinkle chocolate chips over the hot cookie base. Let stand for 5 minutes or until chocolate is softened. Spread chocolate evenly over the base; sprinkle remaining toffee bits evenly over chocolate. Cool until chocolate is set, about 2 to 3 hours. (To set faster, put pan in refrigerator for 45 minutes to 1 hour.)
- When set, cut into irregular sized pieces approximately 2-inches x 2-inches.
|
Hints
- Assume hungry campers will need more than the usual "serving size" as stated on food packages
- To determine how much lunch meat to bring assume 80-100 grams per person per meal
- Assume 100 grams of pasta per person for a dinner
- Bring whole wheat pasta rather than regular "white" pasta - it adds more taste and protein to your meal
- Pre-mix dry ingredients of a recipe before leaving for a trip (pancakes, for example)
- Always use zip-lock freezer bags rather than regular zip-lock bags. They are much stronger and generally have a better zipper.
- Include a flexible cutting board when you go camping. They are inexpensive - only a few dollars - light-weight and take up next to no room in your pack.
- A convenient source of powdered sour cream for camping are in packages of Beef Stroganoff "Hamburger Helper" (or your local grocery store-brand equivalent). Note: Make sure the brand you choose has a separate package of dried sour cream. Not all brands do.
- Bring a light weight table cloth - a large green garbage bag will do. You'll find it is handy for laying out lunch components and for a clean surface to put just-cleaned dishes.
- Cook with water that has been filtered with a filter rated for 0.2 or 0.3 microns. Alternatively, bring the water to a boil before using.
- If you have a vegetarian on your trip, Textured Vegetable Protein (TVP) is a good substitute for ground beef. When combined with other ingredients you can hardly tell the difference.
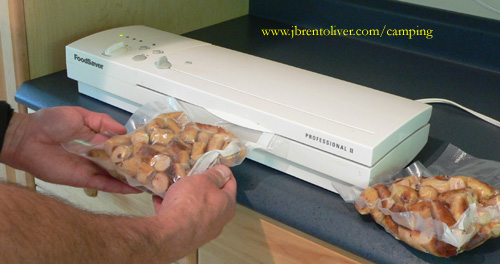
Preparing Food to Last
Dehyrdating food is crucial to providing a varied, tasty menu for any trip over 2 or 3 days in length. A vacuum sealer is a nice addition to your food preparation equipment and can help make your food last even longer.
| Drying Beef |
|
Use this technique to dry beef in such a way that it can be re-hydrated for use in dinner recipes including beef stew.
|
Mix the following ingredients together in a pot:
- 2 cups cold water
- 1/2 cup salt
- 1/4 cup vinegar
|
|
Bring to a boil and then add cubed beef (I use beef tenderloin). Continue to boil for around 5 minutes or until the beef somewhat gray in colour. Remove beef and dehydrate at 150 degrees F for 1 1/2 hours or until meat cracks when bent. Don't dehydrate so much that the beef becomes brittle. The dried beef should keep unrefrigerated for at least a few of weeks, likely longer - store in a vacuum sealed packaging for even longer storage.
Although the beef will rehydrate with 15-20 minutes of being in boiling water you can speed up meal preparation and use less fuel by beginning the rehydrating process 5-6 hours before the beef is needed. To use at dinner start rehydrating at lunch by placing the dried beef in a zip-lock freezer bag or empty Nalgene and adding filtered water until the beef is completely covered.
|
| Beef Jerky |
A favourite for snacking and providing a long lasting protein source on a camping trip is beef jerky. Although readily available pre-made at most grocery stores, beef jerky is easy to make yourself using your dehydrator.
Start with 1 to 1.5 kg of flank steak or boneless outside round.
Freeze meat for 1 to 1 1/2 hours to make slicing easier.
|
Mix the following marinade ingredients together in a large bowl:
- 1/2 cup Soya sauce
- 1/2 cup Worcestershire sauce
- 1/2 cup balsamic vinegar
- 1/2 cup brown sugar
- 1 tsp garlic powder
- 2 tsp onion powder
- 1 tsp black pepper
- 2 tsp seasoned salt
|
- Remove as much of the visible fat as possible from the partially frozen beef.
- Slice meat across the grain to make 1/4" thick slices.
- Add meat to the bowl of marinade and toss the slices to ensure all the meat is covered with marinade.
- Cover bowl and refrigerate meat and marinade for 24 to 48 hours.
- Remove meat from marinade and let excess marinade drip off. Let meat air dry on a rack for 1 to 2 hours in refrigerator.
- Dry in dehydrator at 160F for 2 hours.
- Reduce temperature to 130-140F and dry for 10-14 hours more.
|
More Hints
- To save a lot of preparation time purchase pre-dried foods where possible. In Canada, the Bulk Barn has many of the foods you will need for great meals already dried and ready to go. Look for blueberries, apples, potatoes (flakes and scalloped), cranberries, soup bases, pastas, and many other dried ingredients at the Bulk Barn.
- Salsa: mix chunky salsa in a blender before pouring onto dehydrator tray to speed up drying time
- Use frozen vegetables (peas, carrots, corn kernels, etc.) straight from freezer. They are already pre-cut into small and uniform pieces.
- To dehydrate ground beef, first cooked it thoroughly, then drain off all the fat. Place the cooked ground beef in a strainer and pour boiling water slowly over the beef to remove all remaining fat. Then dehydrate.
- To dehydrate chicken, add boneless, skinless chicken breasts to boiling water and boil for 50-60 minutes to cook the meat fully. Remove from water, shred into small pieces and allow some moisture to evaporate off as it cools for about 10-15 minutes. Then dehydrate at 155F (68C) until completely dry (about 3.5-4.5 hours).
- An alternate method to prepare chicken is to cook the chicken breasts in pineapple juice in an "insta-pot" (or slow cooker). When cooked through use two forks to create "pulled" chicken. Simmer the pulled chicken in a pan with your favourite sauce - butter chicken or salsa, for example. Dehydrate the chicken and sauce mixture. Start rehydrating the mixture when you stop for lunch.
- Mandarin orange segments may take as long as 19 hours to dehydrate. Purchasing dried apricots is a less time-consuming alternative and taste great in a chicken-based meal.
- Dehydrate lemon slices (for about 15 hours). Drop a dried lemon slice or two in your Nalgene water bottle and tea to add a hint of flavour.
- Some foods when dehydrated have sharp and pointy bits which can poke through the plastic when vacuum-sealed. To help prevent poke-through, double bag the food using a milk bag. Cut the top off of a used milk bag, clean and dry thoroughly. Put your food in the milk bag and then put the milk bag and food into the plastic bag that comes with your vacuum-sealer. The heavy plastic used to make the milk bags will often prevent poke-through and loss of vacuum.
- Start rehydrating dinner meats and vegetables at lunch time (or even earlier) to give them plenty of time to re-absorb water. Add the dehydrated food to a freezer-grade zip-lock bag, add clean, filtered water until the food is fully covered. Store the zip-lock bag in a pot or other container container to protect it and your clothes from leakage. We bring a 1-litre Nalgene storage container for this very purpose. It is the perfect size to securely protect a medium-sized zip-lock bag containing food and water (and it is waterproof should the zip-lock bag leak).
- Update (July 2011): Dried whole eggs are now available at Bulk Barn in Ontario. Update (Jan 2013): Dried whole eggs are no longer available at Bulk Barn in Ontario. Another source with delivery from a Canadian distributor is Nutriom OvaEasy Whole Egg Crystals.
- Block cheddar cheeses will last longer and not become oily when wrapped in cheesecloth (or a "J" cloth) soaked in white vinegar. First soak the J-cloth in vinegar, let it dry and then wrap the cheese. Further extend its life by vacuuming sealing the cheese and cloth.
- Dehydrating ham isn't recommended. When dried it does not reabsorb water well. It is certainly edible but can be very chewy, especially if dried too much. If you want to try dehdrating ham, ask at the deli counter for very thinly sliced cuts of the ham that has the lowest moisture content. A good quality black forest ham is often what will be offered.
- Cooking packaged pasta and rice requires a lot of camp fuel. Try these tips:
- Bring water to a boil. Add rice or pasta. Remove from heat and let sit in a pot off to the side for 20 minutes or so. The rice or pasta will continue to absorb water while your stove is off or while you heat other parts of the meal.
- Pre-cook the pasta or rice at home and then dehydrate. The dehydrated pasta or rice will rehydrate faster than cooking from its packaged dry state.
- Before dehydrating, add sauces, vegetables, etc. and dehdryate all together to make a one-pot meal that is quick to prepare at camp and uses very little fuel.


.png)